
|
|
|
|
|
|
|
|
|
|
|
|
|
|
|
|
|
|
|
|
|
|
|
|
|
|
|
|
|
|
|
|
|
|
|
|
|
|
|
|
|
|
|
|
|
|
|
|
|
|
|
|
|
|
|
|
|
|
HOME
AQUABOTS CARBOTS PHOTOVORES PLANTS SYMETS OTHER STUFF TUTORIALS
WALKERS LINKS |
|
|
|
AQUAPOD |
|
|
| The following is a tutorial on how to build a reliable,
water tight, drive unit for your Aquabots. The "Aquapod" is made from easily
obtainable parts and is cheap to construct. The Aquapod can easily be changed
from this generic example to suit your particular application. Read the entire
tutorial before you begin. You are encouraged to print this tutorial out and
place it in your BEAM files for future reference. No commercial use, please.
If you build something using these techniques, just give me a mention. |
|
|
|
|
|
|
|
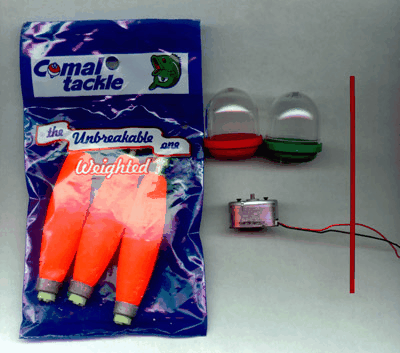
PARTS LIST |
|
|
|
1 Walkman motor
2 vending machine containers (small)
1 bag of 3 weighted floats
1 plastic straw thingy (from Radio Shack)
1 prop (not pictured) |
|
|
TOOLS |
|
|
|
wire cutters
X-acto knife w/extra blades
super glue
60 sec. epoxy glue
tooth picks |
|
|
|
|
|
All but the prop and red straw can be bought at
Walmart. I guess you could buy the red straw too, if you buy a can of WD-40. |
|
|
| STEP 1 |
|
|
|
|
|
|
|
|
|
|
|
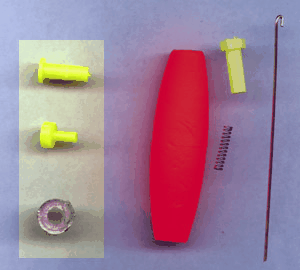
Take one of the
floats and depress the plastic piece on one end. Snip one of the hooked ends
off of the brass wire with your wire cutters. Take the float completely apart.
Take the three parts highlighted and throw the rest in your parts bin. The
two plastic parts and the weight are all you need. You can take another float
apart and keep only the weight. At the end of this tutorial, you will need
both weights. |
|
|
|
|
|
| STEP 2 |
|
|
|
|
|
|
|
|
|
|
|
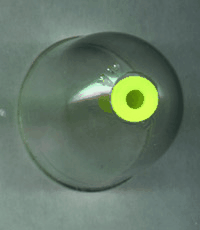
Take one of the vending machine
containers and drill a hole with your X-acto in the exact center of the dome.
There is a small depression in the plastic that you can use as a guide. Use
your X-acto to scrape thin slivers off of the hole until it is large enough
for the end of the larger tube with the flange to fit through fairly snugly. |
|
|
|
|
|
|
|
|
|
|
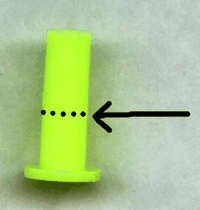
Next, take your
X-acto and cut the tube in half. There is a slight transition here in the
tube. It gets a fraction larger in diameter from the center up to the flange.
Find this line and cut there. Insert the smaller tube to check for length.
You want the larger, outer tube to be slightly shorter than the smaller, inner
tube. |
|
|
| STEP 3 |
|
|
|
|
|
|
|
|
|
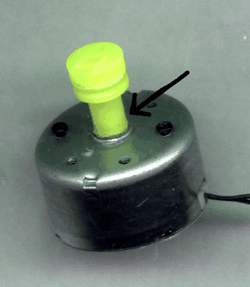
Now, take the large tube and center
the cut end on the bearing and motor shaft. Put the small tube inside to help
keep everything lined up. Place two small drops of super glue on either side
to hold the shaft in place. Be careful to use only a small amount of glue.
Check to make sure you haven't glued the two tubes together. Remove the inner
tube. Let dry. |
|
|
|
|
|
|
|
|
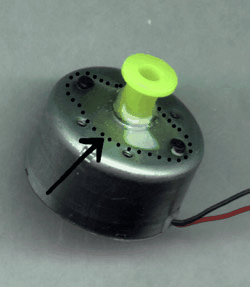
Now, mix a small
amount of epoxy glue and cover the bottom of the shaft. Spread the glue over
to the two mounting screws to help lock everything together. Make sure there
are no gaps where the shaft meets the motor. |
|
|
|
|
|
STEP 4 |
|
|
|
|
|
|
|
|
|
|
|
|
|
|
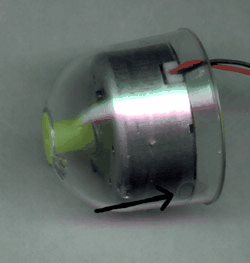
Push the motor into the vending
container that you drilled the hole into. Push it up snug and straight. Add
a couple of small drops of super glue between the motor and plastic to hold
it in place. Let dry. |
|
|
|
|
|
|
|
|
|
|
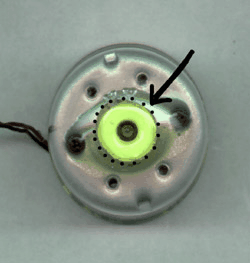
Mix up another
small portion of epoxy glue and make a donut shaped seal around the edge of
the shaft and container with a toothpick. Be careful. Don't get any glue inside
the shaft, yet cover the edge of the shaft thoroughly. |
|
|
|
|
|
|
FINAL ASSEMBLY |
|
|
|
|
|
|
|
|
|
|
|
|
|

|
|
|
|
|
|
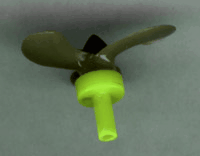
You're almost done! Glue your prop
to the smaller tube. Now, just push the tube with the prop into the inner
sleeve and press onto the motor shaft. This may be a snug fit. If the tube
is to tight, take your X-acto and ream the inner tube out a little. Do this
slowly and a little at a time. Check the fit and repeat if needed. The smaller
shaft may be sanded as well. I bet you are wondering what happened to the
red straw. Some of these Walkman motors have thinner shafts. If your's does,
then cut a small piece of the straw and insert it inside of the prop tube.
Now, slip this onto the motor shaft. At this point you have two choices. You
can place a solar engine and cap inside of the second container. The two
weights are glued inside of the second container as well. Put them toward
the front bottom of the inside of the container. This will help balance the
pod. Seal the two halves together with a bead of epoxy around the point where
the edges meet and let the wires protrude from the seam for hook up to your
solar cell. Seal the solar cell leads and glue it to the top of the pod with
epoxy. The second method is to simply cut the second container of it's excess
room and glue the pieces together with the motor leads coming out. More than
one of the Aquapods can then be hooked to a brain in a different location
on your Aquabot. Remember to cross the motor leads if you want the pod to
move forward with the prop at the rear. Red to negative, black to positive.
If you make the prior version, just add some floats to make the pod positively
bouyant and some hydrofoils to make it dive and you're in buisness. Or put
legs on it and make it rise up from the bottom. This same method can be used
on gear motors as well if the propper shafts are found. Remember to place
a couple drops of oil between the prop shaft and the inner sleeve. This will
help keep your water tight seal. Not to much! Let it creep into the space
between the shafts by capillary action. You now have a water tight motor pod.
There are endless ways that it can be used to move your creations through
the briney deep. Good luck, and write me if you have any questions. |
|
|
HOME
AQUABOTS CARBOTS PHOTOVORES PLANTS SYMETS OTHER STUFF TUTORIALS
WALKERS LINKS |
|
|
|
Copyright 1999, all rights reserved,
Jim Mullins DBA Studio One. |
|